Tuesday, September 13, 2016

Master Bath

After a very long hiatus, we are making an effort to wrap things up and post pictures of the nearly finished house. First up, the new master bathroom! 

The master bath is situated next to the master bedroom and there is a second entrance to it off of the hallway to the "back door" (it's not really on the back side of the house but it leads out to the garage). Our aim was to make it accessible as possible, so there is no threshold and the shower is curb-less.


The bathroom floor, which is heated, is beige porcelain tile and the shower walls are slate and the travertine that was leftover from the other bathroom.


The bathroom door at the hallway entrance is made of three Osage orange boards with a piece of walnut trim and it is mounted with barn door hardware. Tom made this natural-edge door and it is gorgeous!   


The "steampunk" shower hardware is rigged from findings in the plumbing aisle. We will eventually upgrade these with brass pipes. 


The sink and cabinet were found in the "as is" section at Ikea. The backsplash is a sheet of copper and the antique beveled-edge mirror is mounted with simple hardware. 


The window was purchased from a Habitat for Humanity ReStore. The window treatments are from Ikea, and there is a mirrored IKEA tall cabinet next to the window for extra storage.


The wall opposite the shower, sink, and toilet is covered with sheets of luan detailed with walnut trim. The long piece of conduit serves as a towel bar. A pocket door made from birch plywood with walnut trim leads to the master bedroom.


Friday, January 2, 2015

Happy New Year 2015!

We moved into our 1,985 square foot house in late February of 2014, and while much progress has been made on the house, no progress was made on this blog. Our new year's resolution is to do some catching up! So stay tuned...
Thanksgiving 2014

Monday, January 20, 2014

Purpleheart and Slate

I'm behind in updates here; it's been busy since the last post, with the holidays, crazy weather, keeping up with two houses, and selling one of them. We've been keeping the wood stove burning for warmth at the 1,985 Sq Ft Ranch, though, and have been powering through the winter cold.

The kitchen is taking shape: the cabinets are installed, some appliances are in place, and most importantly ... we have counters! We weren't really sure what we were going to use for countertops. Choices like granite, quartz, and the cool "eco" counters made of paper or glass were way out of our budget. We had thought of just using plywood until we could afford something better, or trying our hand at concrete counters. Then I saw a photo of an old slate chalkboard used for a counter and turned to Craigslist to search for some. We found a man with a barnful of old blackboards from a school that was being torn down and paid $200 for the two largest pieces.

We had planned to use the slate for the long counters on either side of the sink, but we were still uncertain what to do for the island. Then, one morning Tom had an epiphany: use the slate on the island and see if we could find a big board that could serve as the long counter. A few years ago we had seen some huge planks of purpleheart at a local wood store. Were they still there? Yep. One big board, 25" wide and 13' long for $190. So for $400 and a lot of work hauling, lifiting, sawing, griding, sanding, and varnishing, we have counters.
Buying the purpleheart board

We managed to get it in the truck (we actually did strap it down very securely!)

Belt sander first

Trying it out in place with the sink opening template

This photo doesn't do it justice; it really is almost purple in color
Cutting out the sink opening. Purpleheart is so hard that two saw blades got stuck. The denseness of the wood makes it nearly rot proof, so it's perfect for the surface around the sink.

With a long piece of curly maple for a back edge

Island base: one side is Ikea cabinets and the shelves are custom built by Tom

Two layers of plywood plus a piece of cement board as the base for the slate

Dry fitting the two chalkboards and a sneak preview of the cooktop

The slate was cut to size with a circular saw and a steady hand. We used thinset to hold it in place

Getting the seam between the two pieces level

Polished, sealed, and waiting for the cooktop and trim. Curly maple trim has been added to the vent hood and at the sink apron.


Sunday, November 17, 2013

A Little Light

Kitchen cabinets are going up.

With lighting in the cabinets and under the cabinets.

Travertine tile on the bathroom floor. It's been sealed and grout is coming soon.

There's also travertine on the shower wall and black pebbles on the shower floor.

Wednesday, September 18, 2013

Laundry Room and Goodbye to Mr. Stump

Things are continuing to take shape. The old kitchen cabinets are now cleaned up and installed in the laundry room. That room doesn't have any windows, but there is now a combination skylight/solar chimney that will provide us with some illumination and ventilation.


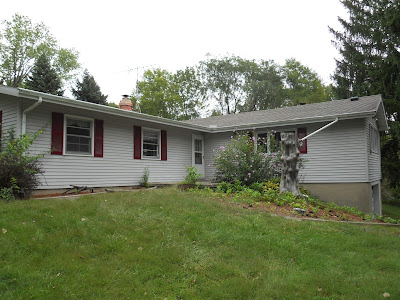
One of the oddities of the house when we bought it several years ago was the large stump that stood in the front of the house. The previous owners had decided that it was the perfect thing to attach a downspout to and it sort of became a part of the house's architecture. We decided to give it a shove the other day, having made a few other attempts over the past months to see if it would give. Well, the weather and the bugs finally had their way with it and over it tipped, crumbling into a pile of mulch, bugs, and two snakes. 
Fall 2010, Mr. Stump standing tall and creatively attached to the house with a downspout. 

September 2013: Mr. Stump is no more.


Sunday, August 25, 2013

Tile Sneak Peek

It's here! We moved 150 16x16 pieces of travertine tile from Home Depot to the house today; 50 in my car and 100 in the truck, 1600 lbs total. It's gorgeous! Now we just need to install it.


Thursday, July 25, 2013

The Great Wall of Storage

The latest project has been the construction of the wall dividing the bathroom from the laundry room. This isn't just any wall; it's the Wall of Storage. On the bathroom side, there will be tall cupboards for storing bathroom stuff. On the laundry room side there are deeper cubbies, which we may just decide to leave open. One of the bays will allow laundry, dirty and clean, to pass between the two rooms. Two drawers, accessed from the bathroom side, hold laundry baskets so that dirty towels and clothes can be tossed in from the bathroom side. Above are cupboards that can be stocked with clean towels from the laundry side and accessed from the bathroom side. Genius, right?

Laundry room side 
Laundry room side. The nook at the right where the drill now is will be occupied by a stacking washer and dryer.


Laundry baskets and ventilation.

From the bathroom side (note the grab bar/towel bar at right—it's never too early to plan for later!) 
Looking into the bathroom from the doorway.

Toilet nook
Ikea sink installed. A find in the "As Is" department a few years ago. That pipe in the wall is called a Studer vent. It will be covered by a mirror later.
Next up will be tiling the bathroom floor and the shower stall. Stay tuned!